
Yes I know - this has not got anything to do with mobile computing (sorry), and No, its not an april hoax at all - but I simply had to write about it..
as you can see on the youTube video below, this guy actually makes a small (and inefficient but still amazing) solar panel at home - from donuts, "starbucks passion" red hibiscus flower tea, water, vodka and some microscopy object slides...
Educational - and VERY funny to watch and listen!
You can also read about the whole story here:
http://blog.wired.com/wiredscience/2009/03/donutsolar.html
Tuesday, March 31, 2009
Sunday, March 29, 2009
Asus selling iMac clone with netbook core
I'm sure everyone knows those design-award-winning Apple iMac computers that look like just a flat panel LCD and keyboard standing on your desk, but contain a whole macintosh...
Now Asus has realized the advantages of such a design and is selling a computer-inside-an-LCD too. The "Asus eeeTop ET1602" has about the same specs as the average eeePC 1000H netbook (making guesses about the interior of this device very easy), namely intel Atom N270 clocked to 1.6GHz, 533MHz Frontside Bus, 1GB DDR2 RAM, the rather weak Intel 945G graphics chipset, 160GB SATA-II harddisk (spinning at only 5400rpm), connectivity is provided by 802.11 b/g/n wifi, bluetooth and 1000MBit LAN, the thing has a 1.3MP webcam and built-in stereo microphone - and so far, I could just as well have read the description from the package of my eee1000H instead, without any difference...
 But this "eeeTop" you can see on the left has a big 15.6 inch "single-touch" touchscreen instead (with a 16:9 resolution of 1366x768 pixels), and four speakers - as well as dolby 5.1 support - and six USB ports. On the backside there is a nice foldable metal stand in case you don't want it hanging from your wall but standing on your desk instead (probably what most would do - who wants to stand in front of his computer all the time?). It comes with keyboard, mouse and a handle to carry it with you (at a weight of 4.4Kg probably no fun compared to the eeePC netbooks, but still better than carrying a big desktop tower PC) and can be had in either white or black, and for those interested in computer games, there is also an extended model with ATI "Radeon HD3450 Mobility" graphics card available, called "eeeTop ET1603" - which also has a battery built-in for easy LAN-party computer gaming sessions with your friends (if you're into gaming, that is).
All in all, at a price of 500 euro upwards, it is definately an inexpensive alternative to buying a much more expensive iMac. Of course the latter offers much more computing power compared to the Atom processor, but if you just use it for simple tasks like surfing the internet, VoIP telephony (skypephone), watching movies and writing texts/email, you most probably will not have problems when using an Atom-based computer.. and if you install MacOS X onto this eeeTop, the difference is not that big anymore! :^)
Note that Apple does not allow installing their MacOS on any hardware but Apple Macintosh computers, and only if you own the proper license (meaning a bought one!). So although it is entirely possible(!) to use MacOS X on a non-Apple PC, the above statement is of purely theoretical nature, and I don't want to encourage anyone to install MacOS X onto their non-Apple machines!
That being said, here's a link explaining how to do it anyway: eeemac.blogspot.com.
Also strictly of theoretical nature. :~D
Thursday, March 26, 2009
HowTo: formatting SD cards using linux
Its nice to see that during the past year, the number of linux distributions custom tailored to fit the needs of netbooks has increased dramatically. While this is a great advancement, it cannot be denied that this is mainly the merit of one linux distribution - ubuntu linux, on which most of nowadays "netbook linux" are based (ubuntu in turn is debian-based, btw).
While these custom netbook linux flavors usually come equipped with all the device drivers you'll need for your netbook, there's one thing that is missing (at least in Ubuntu 8.04 or "Ubuntu eee"): an easy possibility of formatting SD memory cards with the usual FAT16 (or the faster FAT32) file system with the card reader that is built into all eeePC models - but sometimes you just need an empty and freshly formatted SD card, for example to "burn" the newest ubuntu ISO image onto and install right from the SD card (which is quite handy if you don't have a DVD/CD drive).
So, what to do? The easiest way I found is to use the command line tool "mkdosfs" for this purpose.
In order to have "mkdosfs" format your SD card so you can use it in your camera or MP3 player, we first need to find out how the SD card reader drive is currently called on your system, this is done by simply inserting your SD card, waiting a few seconds until your PC has recognized it, opening up a terminal window and typing
sudo df
which gives an output similar to the following

So in my case "/dev/sdb1" is how the SD card reader is called: I know I have an empty 4GB SD card inserted, and "Available:3981704" and "1K-Blocks:3981708" tell me that the last entry (almost) matches this size and is almost empty too, so this is my device I'm looking for.
Next step needed is to unmount your sd card since you cannot format any storage devices while they are mounted:
sudo umount /dev/sdb1
and then format the SD card (of course this erases all previous data stored on it) with either FAT16 or FAT32 as you need:
sudo mkdosfs /dev/sdb1 -F16
(for formatting with FAT16)
or
sudo mkdosfs /dev/sdb1 -F32
(for FAT32)
Now you just need to re-mount the SD card (easiest way is to simply take it out and re-insert) and you're ready to store your data on it again.
In future ubuntu versions it will most probably be possible to format SD cards with graphical GUI and mouse clicks too (like it should be), but any ubuntu 8.04 user having tried to format SDs with FAT file system can still benefit from this howto I bet.
Wednesday, March 25, 2009
My ongoing eeePC "3G mod" adventure
Since last night, I had the doubtful joy of having to re-solder two pins of my extra miniPCIe socket (I accidentally dropped my eee from ~50cm heigth and afterwards the 3G card wouldn't work anymore, which was pretty annoying since I need internet access - so I had to re-open the whole apparatus and take apart everything, leading to the lucky discovery of only said two loose pins as a cause for the malfunction), I will take this as an opportunity to give you the gentle reader some more details about the inner workings of how I did this modification (there may exist better ways I must admit, specifically for securing the modem card in place). That being said, you will surely remember that there's an old and well known (and true!) proverb saying "A picture sometimes tells more than a thousand words"...
So here are some pictures.

Here's a picture showing my Sierra MC8775 3G modem card inserted and secured down with stiff wire (soldered to the motherboard and bent around the cards edges firmly) (the red stuff is just to hide my IMEI to avoid abuse of it)
 this nice and very professional(!) drawing of mine served me well when I had to check for contact between SIM slot and miniPCIe socket (and it also served well as a drip mat for my coffee cup, as you can see by the brown circular stains it left). All SIM slot pins except "pin 2/GND" are wired to the smaller side of the connector, and contrary to this art piece of a wiring schematic, "pin 4/VPP" is not connected on the eeePC motherboard at all (soldering them is not needed). I hope you can still decipher it when you click on it to enlarge!
Now my 3G card is working again, and I'm happy again too.
I think I applied enough solder this time too to prevent further similar incidents.
Tuesday, March 24, 2009
Fujitsu U2010: tiny convertible netbook with GPS
 This is another example for gadgets that will probably never make it to the european market, so considering that you'd need to buy it from asia anyway, I think I can just as well report about the korean version here - of course its sold in other asian countries too, but to my knowledge it is available with GPS only in korea, so this model indeed has its advantages. According to Fujitsu Korea, their model has a Sirf3-GPS-chipset and further it differs in other components too from the taiwanese and japanese models, namely being only available with a 120GB hard disk or 64GB solid state disk as the only storage options. Everything else is pretty similar to all other countrie's types of the U2010 for korean buyers: Intel Atom Z530 running at 1.6GHz, 1GB RAM, 5.6" touchscreen LCD with a resolution of 1280x800 pixels (convertible for tablet mode), 3.5G wireless broadband, 802.11a/b/g/n wifi and bluetooth, the package is rounded by a biometric fingerprint reader and 1.3MP webcam. Estimated price is 1300$US for the harddisk version and 2200$US (!) for the SSD version, making this an expensive gadget to own.
But a nice one (at a weight of a mere 600 grams, that is), and furthermore a true handheld device too. Most probably perfect for geocaching (especially with the also available extended battery pack for up to 11h run time - in this case giving "run time" a completely new meaning, lol) or just as a versatile navigation device for your car, if you can spend the money. And of course its a fully usable mobile personal computer too, with great web browsing capabilities. Only eBook reading might become difficult with longer texts, due to the screen size which is just a bit too small.
(donations made to my paypal account in a heigth of 1300$ are guaranteed by me to be transferred immediately into ownership of such a device)
Saturday, March 21, 2009
Foldable keyboard for your UMPC - an update
For all those users without free USB ports on their smartphones, PDAs, MIDs and other devices, or those with an aversion against cables in general, there are also bluetooth versions of those full-sized foldable keyboards I mentioned already on this blog few days ago - namely I'd like to make mention here of the "Freedom Universal Keyboard²" (from a company called Freedom  Input Ltd) with its own two AAA sized batteries and - most important - bluetooth! The manufacturer claims that due to support for both HID mode (used and recognized by all PCs, most PDAs, UMPCs and smartphones) and SPP mode, a bluetooth serial port emulation protocol utilized by the blackberry family of smartphones for example, this gadget enjoys comaptibility to >200 different devices. Sure is that every device with bluetooth and either Blackberry OS 4.0 and upwards, symbian OS v9, or windows mobile 5 & 6 ( both PPC and smartphone edition), as well as Windows 2000 and WinXP is supported without need to install any drivers. No mention of linux though, and what about windows CE?? Anyway. It also comes with own PDA stand and nice genuine black leather case, (which surely added to the price enough to make it as high as 120$US), and weighs only 204 grams at 145 x 98.5 x 19.5 mm (folded together). The package is completed by user definable shortcut-style hotkeys, and to date it is available with english and german keyboard layout (french will be available too, someday). If you ever tried to write any decent piece of text with a blackberry for example, you would highly appreciate being gifted with such a thing for the next occasion I'd bet!

 Input Ltd) with its own two AAA sized batteries and - most important - bluetooth! The manufacturer claims that due to support for both HID mode (used and recognized by all PCs, most PDAs, UMPCs and smartphones) and SPP mode, a bluetooth serial port emulation protocol utilized by the blackberry family of smartphones for example, this gadget enjoys comaptibility to >200 different devices. Sure is that every device with bluetooth and either Blackberry OS 4.0 and upwards, symbian OS v9, or windows mobile 5 & 6 ( both PPC and smartphone edition), as well as Windows 2000 and WinXP is supported without need to install any drivers. No mention of linux though, and what about windows CE?? Anyway. It also comes with own PDA stand and nice genuine black leather case, (which surely added to the price enough to make it as high as 120$US), and weighs only 204 grams at 145 x 98.5 x 19.5 mm (folded together). The package is completed by user definable shortcut-style hotkeys, and to date it is available with english and german keyboard layout (french will be available too, someday). If you ever tried to write any decent piece of text with a blackberry for example, you would highly appreciate being gifted with such a thing for the next occasion I'd bet!
Friday, March 20, 2009
HowTo: Add 3G/HSDPA functionality to your eeePC 1000H
During the last few months, Asus has started selling the "eeePC 1000H GO" with internal 3G/HSDPA card for easy everywhere connectivity. So far so good, but what about all those thousands of customers that already bought an eeePC 1000H before? Are they doomed to use one of those ugly external USB 3G modems - a threat to your eeePCs health if you drop it accidentally and the USB stick destroys the USB port it was sticking in (if not even more)...
No, I didn't want that to happen to me. But I still wanted 3G for my eeePC!
Luckily there's a solution to this dilemma.
 Clever guys (credit goes especially to forum member "packer"!) over at the eeeuser.com forums found out time ago that the motherboard of all eeePCs (from the 90x series on upwards) is basically of the same layout, which does feature free designated areas and soldering spots for a SIM card holder and a miniPCIe 3G modem card (obviously intended by asus for use in the later eeePC "GO" models), and some even more clever guys (JKK? tnkgrl?) discovered that all one has to do to enable said 3G functionality is solder the needed connectors to the motherboard and bridge a few pins. So far the theory.
Sounded nice, so I decided to add 3G to my eeePC too. And went on to gather the necessary parts (unlocked Sierra MC8775 miniPCIe modem card, the appropriate miniPCIe socket, UMTS antenna and a SIM slot) which took me some weeks. After everything finally had arrived (thanks go out to Christopher, Greg, Torsten - you know who is meant!), I dissected my eeePC, cut out a SIM card slot behind the battery, and heated up my soldering iron (I used a 14W one with fine tip). Turned out not everything was as easy as thought at that point, in that this soldering job was in fact REALLY difficult due to the pin distance being less than 1mm, causing unpleasant capillary forces make the solder flow upwards between the pins (shorting everything) and all other kinds of ugly stuff. You can get an idea about the problems I had if you take a look at all those scratch marks I made on my motherboard during my efforts to remove shorts between the pins..

Soldering this one wasn't as easy as I had thought originally!

Three days later(!) and only by extensive use of my trusty multimeter (set to "beep" continuity testing), I was at a point where everything had contact and nothing was shorted, and the 3G card worked. Only two downsides were: firstly that I had been required to modify the SIM slot until it was not of the push-type anymore, to be able to put the battery back on with SIM card inserted, and so had to use some smooth electrical tape to insert it and get it out again (as seen on picture). Other downside was that the reception was sub-optimal to say the least, although the antenna had been quite expensive (30 eur!). It turned out that in the location I had installed it - behind the LCD - it did not work properly. Once I had re-opened the screen lid and relocated the antenna to the back side of the screen lid (where it was attached to the plastic cover from outside with some electrical tape) reception was a bit better, but now the thing did not look nice and the screen lid was half-open.
 This antenna, although expensive,
was only good as a pigtail cable source for this mod!
I left the screen lid in that condition until a better antenna had been bought and delivered (a replacement cellphone antenna for the "motorola RAZR V3X"), which took another two weeks. The new antenna (resembling a large paper clip and galvanized with golden coating) was then slightly modified and mounted into upper right screen area, where it still sits until today. It has a much better reception, fit very well and I've finally been able to screw the screen lid back together and complete this rather stressful mod. I must admit that I almost gave up in the middle of the soldering ...
But in the end it was totally worth it.
 probably the best antenna you can use for this mod!
The antenna required that I removed it from the plastic socket it was sticking in (which was very easy), then breaking off the little golden pin protruding in a 90° angle from the main antenna body and re-soldering it to the same location in a different angle - flat with the antenna body at 180° angle. The pigtail cable was cut off from my first antenna, and the inner conductor was stripped off of its insulation by 2 mm or so, and soldered to the very end of the new antenna's modified pin. The shielding of the pigtail cable was connected to ground by tucking it below the LCD's metal bracket as seen on the picture, to make the LCD case shielding act like a "ground plane" for the antenna (search wikipedia for "groundplane" for a good explanation, it wouldn't fit here). Everything was protected from shorts with that red electrical tape you see on the picture, and fixed down with a drop of hot glue.
This antenna now gives me usually -86dB signal strength (everything above -90dB is considered "good"). I have between 1.1 and 2.8MBit/s connection speed depending on time of the day, which surely is ok for me....
 Mission accomplished!
You can read everything about the whole story behind this mod here:
http://forum.eeeuser.com/viewtopic.php?id=39580
Or you can buy a 1000H GO - its cheaper than my normal 1000h plus the extra parts I built in....
But where's the fun in that I ask?
By the way, if you are in need for a step-by-step guide on how to open up an eeepc, I can really recommend the very detailed instructions found here on justblair's DIY pages, its the best guide I've seen so far - easy to follow. I guess I don't need it anymore, but its good to have that info included here as well right?
No, I didn't want that to happen to me. But I still wanted 3G for my eeePC!
Luckily there's a solution to this dilemma.
 Clever guys (credit goes especially to forum member "packer"!) over at the eeeuser.com forums found out time ago that the motherboard of all eeePCs (from the 90x series on upwards) is basically of the same layout, which does feature free designated areas and soldering spots for a SIM card holder and a miniPCIe 3G modem card (obviously intended by asus for use in the later eeePC "GO" models), and some even more clever guys (JKK? tnkgrl?) discovered that all one has to do to enable said 3G functionality is solder the needed connectors to the motherboard and bridge a few pins. So far the theory.
Sounded nice, so I decided to add 3G to my eeePC too. And went on to gather the necessary parts (unlocked Sierra MC8775 miniPCIe modem card, the appropriate miniPCIe socket, UMTS antenna and a SIM slot) which took
 me some weeks. After everything finally had arrived (thanks go out to Christopher, Greg, Torsten - you know who is meant!), I dissected my eeePC, cut out a SIM card slot behind the battery, and heated up my soldering iron (I used a 14W one with fine tip). Turned out not everything was as easy as thought at that point, in that this soldering job was in fact REALLY difficult due to the pin distance being less than 1mm, causing unpleasant capillary forces make the solder flow upwards between the pins (shorting everything) and all other kinds of ugly stuff. You can get an idea about the problems I had if you take a look at all those scratch marks I made on my motherboard during my efforts to remove shorts between the pins..
Soldering this one wasn't as easy as I had thought originally!

Three days later(!) and only by extensive use of my trusty multimeter (set to "beep" continuity testing), I was at a point where everything had contact and nothing was shorted, and the 3G card worked.
 Only two downsides were: firstly that I had been required to modify the SIM slot until it was not of the push-type anymore, to be able to put the battery back on with SIM card inserted, and so had to use some smooth electrical tape to insert it and get it out again (as seen on picture). Other downside was that the reception was sub-optimal to say the least, although the antenna had been quite expensive (30 eur!). It turned out that in the location I had installed it - behind the LCD - it did not work properly. Once I had re-opened the screen lid and relocated the antenna to the back side of the screen lid (where it was attached to the plastic cover from outside with some electrical tape) reception was a bit better, but now the thing did not look nice and the screen lid was half-open.
 This antenna, although expensive,
was only good as a pigtail cable source for this mod!
I left the screen lid in that condition until a better antenna had been bought and delivered (a replacement cellphone antenna for the "motorola RAZR V3X"), which took another two weeks. The new antenna (resembling a large paper clip and galvanized with golden coating) was then slightly modified and mounted into upper right screen area, where it still sits until today. It has a much better reception, fit very well and I've finally been able to screw the screen lid back together and complete this rather stressful mod. I must admit that I almost gave up in the middle of the soldering ...
But in the end it was totally worth it.
 probably the best antenna you can use for this mod!
The antenna required that I removed it from the plastic socket it was sticking in (which was very easy), then breaking off the little golden pin protruding in a 90° angle from the main antenna body and re-soldering it to the same location in a different angle - flat with the antenna body at 180° angle. The pigtail cable was cut off from my first antenna, and the inner conductor was stripped off of its insulation by 2 mm or so, and soldered to the very end of the new antenna's modified pin. The shielding of the pigtail cable was connected to ground by tucking it below the LCD's metal bracket as seen on the picture, to make the LCD case shielding act like a "ground plane" for the antenna (search wikipedia for "groundplane" for a good explanation, it wouldn't fit here). Everything was protected from shorts with that red electrical tape you see on the picture, and fixed down with a drop of hot glue.
This antenna now gives me usually -86dB signal strength (everything above -90dB is considered "good"). I have between 1.1 and 2.8MBit/s connection speed depending on time of the day, which surely is ok for me....
 Mission accomplished!
You can read everything about the whole story behind this mod here:
http://forum.eeeuser.com/viewtopic.php?id=39580
Or you can buy a 1000H GO - its cheaper than my normal 1000h plus the extra parts I built in....
But where's the fun in that I ask?
By the way, if you are in need for a step-by-step guide on how to open up an eeepc, I can really recommend the very detailed instructions found here on justblair's DIY pages, its the best guide I've seen so far - easy to follow. I guess I don't need it anymore, but its good to have that info included here as well right?
Thursday, March 19, 2009
Foldable USB keyboard simplifies typing with your UMPC

Most of the UMPC and MIDs available today share the same disadvantage: most of the time the keyboard just doesn't work well at those tiny key sizes, especially if you have large hands. What to do? One possible solution could be using one of these ultra-portable external keyboards with your UMPC! The device shown on the right for example, bearing the rather technical description "Targus PA875U01X", weighs just 180 grams at a size of 280 x 108 x 9 mm (unfolded), with 68 full-sized keys in QWERTY layout - enabling easy and smooth ten-finger typing for the mobile email enthusiast. Price around 40-60 USD as seen in various online retail stores..
Just a remark, the very same foldable keyboard is available from AsusTek too under the name "Asus R2H Slim USB 2.0 foldable keyboard" (vendor product number 04GNGV1KUS00) for as little as 30$US if you look around a bit. (note the difference between a small customer and a big one like AsusTek when it comes to purchase prices?!)

same model, other logo
UMID M1 - design meets function
 The UMID M1 will be available in two variants: the "High" version includes a 16GB SSD and is powered by an Intel Atom clocked to 1.33GHz, while the "Low" version comes with Linux preinstalled and has only 8GB flash storage and its Atom runs a bit slower too at 1.1GHz. Both versions have a 4.8" touchscreen with a "wide" resolution of 1024 x 600 pixels, 512MB of fast 533MHz DDRII RAM, Bluetooth 2.0,
  also 802.11b/g wifi and HSDPA (with own SIM card slot), connection to other devices is established with USB2.0, but you can also use the microSD-card reader for synchronizing data with, for example, your smartphone. Also included is a 1.3MP webcam for video telephony via skype or other VoIP-based services, and everything is powered by a 2400mAh Li-ion battery. At dimensions of 158 x 94 x 18.6 mm it weighs 315 grams - perfect for carrying it with you all the time. And the design is - in my opinion - awesome.
It will be available in europe by may, price unknown yet..
Wednesday, March 18, 2009
HowTo: Measuring hard disk performance with linux and 'hdparm'
Measuring sequential disk performance with linux is easy - most distros (like ubuntu) come with a tool called hdparm, that is mainly used for tuning and optimizing hard disk parameters, but luckily it also includes simple benchmark functionality - for example the following command
sudo hdparm -t /dev/sda
gives me the following output:
 /dev/hda:
Timing buffered disk reads:  176 MB in  3.01 seconds = 58.55 MB/sec
Of course you need to substitute /dev/sda with the name of your raw disk device (for example, it might be /dev/hda for non-SATA disks). Its impossible to get higher transfer rates that that from your disk. Hdparm reads at the very start of the disk for these tests (which is the fastest area of the whole harddisk) and using optimal access pattern.
If you'd like to test your harddisk's cached performance too, you can do so by using "hdparm -tT" (note additional T) to get an output similar to the following:
Timing cached reads: 1198 MB in 2.00 seconds = 598.98 MB/sec
Timing buffered disk reads: 170 MB in 3.00 seconds = 56.65 MB/sec
Of course all of the above tests need to be conducted at least 2-3 times and the results averaged to get some meaningful results..
BTW to check whether your system supports SATA-1 or -2, the following switch is needed:
hdparm -I /dev/sda | grep SATA
which gives as output either one or both of the following lines:
* SATA-I signaling speed (1.5Gb/s)
* SATA-II signaling speed (3.0Gb/s)
Have fun testing.
HowTo: Make navigable website snapshots with linux and 'wget'
Everyone has his own favorite websites - for some folks they are even important enough to store a snapshot on their hard disk for backup and/or archiving purposes. While the google cache surely helps alot when it comes to retrieving lost or otherwise inaccessible information on the web, a real backup copy on your own harddisk is sometimes more appropriate. For these purpose there exist anumber of software solutions, but by far the easiest, most convenient and cheapest way to store a fully clickable snapshot of your favorite website is using the linux command line tool "wget". For windows users there also exists a port of wget written by Christopher Lewis found here.
Now assuming you have a working version of wget installed on your system, let's go through the parameters that are neccessary to have Wget do what we want it to, using the following example for making a snapshot of all my posts on eeeGadgets:
-r wget searches the target website recursively for subfolders and external folders that are being linked to
-l1 defines the depth of links to store in our snapshot (in most cases 1 or 2 is sufficient here)
-N wget adds a timestamp to the snapshot for easy later archiving of different snapshots
-k causes wget to change "absolute" (real web) links into "relative" (snapshot file) links, this should always be enabled if you want the links in your snapshot to also work when offline viewing it
-x wget uses the original folder structure as found on the target website (there's also an opposite parameter -nd which causes all files to be written into just one big directory)
When called with these parameters, wget will download all necessary files into the current folder, so you should first make an appropriate one ("mkdir /home/MySnapshotFolderName && cd /home/MySnapshotFolderName") before running the "wget..." command.
And voilà - a complete snapshot of your favorite website, stored on your personal harddisk for eternal backup...
Now assuming you have a working version of wget installed on your system, let's go through the parameters that are neccessary to have Wget do what we want it to, using the following example for making a snapshot of all my posts on eeeGadgets:
wget -r -l1 -N -k -x http://eeegadgets.blogspot.com/search/label/all posts
-r wget searches the target website recursively for subfolders and external folders that are being linked to
-l1 defines the depth of links to store in our snapshot (in most cases 1 or 2 is sufficient here)
-N wget adds a timestamp to the snapshot for easy later archiving of different snapshots
-k causes wget to change "absolute" (real web) links into "relative" (snapshot file) links, this should always be enabled if you want the links in your snapshot to also work when offline viewing it
-x wget uses the original folder structure as found on the target website (there's also an opposite parameter -nd which causes all files to be written into just one big directory)
When called with these parameters, wget will download all necessary files into the current folder, so you should first make an appropriate one ("mkdir /home/MySnapshotFolderName && cd /home/MySnapshotFolderName") before running the "wget..." command.
And voilà - a complete snapshot of your favorite website, stored on your personal harddisk for eternal backup...
HowTo: optimize your wireless broadband speed when running Ubuntu
At present time, many 3G/HSDPA modems need the driver module "usbserial.ko" if you want to use them with Ubuntu linux. While this alone doesn't present a problem, it is far more problematic that said "usbserial" driver module wasn't designed for the data throughput rates seen with today's broadband connections, and so has only a very small data buffer for the serial ports it emulates - insufficient for an average HSDPA connection, resulting in not as much bandwidth as you would expect.
As I own a Sierra MC8775 3G modem and am running ubuntu 8.04 on my eeePC, I had exactly this issue, and so went to search for a solution - and found a rather nice one, which requires quite a bit of software hackery but works pretty good (almost 2x the data throughput for me!): a patch that modifies "usbserial.ko" to have a variable buffer size!
It is not easy to pull off for the novice and requires knowledge of basic linux commands for copying, renaming, deleting and moving files and creating directories, as well as extracting archives, basic knowledge about how to compile stuff using "make" - and lastly you should be familiar with adding new driver modules to your system too..
Also of course you need the basic linux packages required for compiling stuff (just apt-get install what is missing if some error occurs during compiling, and if your linux moans about something needed but not installed...)
Here's what I did, explained in ten steps:
1. Become root: "sudo -s"
2. Download the "linux-source" package and extract it to some folder (I created the folder /usr/src/linux-source-2.6.24/ on my system for this purpose)
3. copy your current kernel config to the new source directory you just made:
"cp /boot/config-$(uname -r) /usr/src/linux-source-2.6.24/.config"
4. goto the source directory and create a config file for compiling the module:
"cd /usr/src/linux-source-2.6.24/ && make menuconfig" (just press [rightArrow] then [Enter] to exit when the graphical menu pops up)
5. copy the following code and insert + save to some empty file (I used "/root/usbserial.c.patch" to save to):
# diff -Naur usb-serial.c usb-serial-v620.c
6. apply your newly created patch file to the source code of "usbserial.c":
"cd /usr/src/linux-source-2.6.24 && patch -Np0 -i /root/usbserial.c.patch"
7. if not all patches were applied successfully (was the case for me), you need to edit usbserial.c manually and replace the line that reads
buffer_size = le16_to_cpu(endpoint->wMaxPacketSize);
with the following lines:
buffer_size = (endpoint->wMaxPacketSize > maxSize)?endpoint->wMaxPacketSize:maxSize; port->bulk_in_size = buffer_size;
port->bulk_in_endpointAddress = endpoint->bEndpointAddress;
port->bulk_in_buffer = kmalloc (buffer_size, GFP_KERNEL);
8. compile the module (actually all serial driver modules used for usb devices, but still faster than compiling all kernel modules!):
"make -C /lib/modules/$(uname -r)/build M=/usr/src/linux-source-2.6.24/drivers/usb/serial"
9. make a backup copy of your old "usbserial.ko" by renaming it to something like "usbserial.ko.old", then copy your new patched "usbserial.ko" to /lib/modules/kernel/drivers/usb/serial/ and run "depmod -a".
10. After unloading your old usbserial (modprobe -r), you can now load your new "ubserial" driver module with the additional module option "maxSize=xxxx" (where xxxx can be 2048 for example), I use "modprobe usbserial vendor=0x03f0 product=0x1e1d maxSize=2048" to have it identify my SierraMC8775 modem properly and to give it a big enough data buffer to cope with HSDPA traffic.
You can easily check if you were successful in patching your "usbserial.ko" without having to load/reload it by easily typing "modinfo usbserial" - if everything went well you will see a new module parameter "maxSize" listed....
If everything went well you will have notably higher data transfer/download rates with your wireless 3G/UMTS/HSDPA braodband (you can easily check this with the bandwidth performance check on the bottom of my page).
Regards
As I own a Sierra MC8775 3G modem and am running ubuntu 8.04 on my eeePC, I had exactly this issue, and so went to search for a solution - and found a rather nice one, which requires quite a bit of software hackery but works pretty good (almost 2x the data throughput for me!): a patch that modifies "usbserial.ko" to have a variable buffer size!
It is not easy to pull off for the novice and requires knowledge of basic linux commands for copying, renaming, deleting and moving files and creating directories, as well as extracting archives, basic knowledge about how to compile stuff using "make" - and lastly you should be familiar with adding new driver modules to your system too..
Also of course you need the basic linux packages required for compiling stuff (just apt-get install what is missing if some error occurs during compiling, and if your linux moans about something needed but not installed...)
Here's what I did, explained in ten steps:
1. Become root: "sudo -s"
2. Download the "linux-source" package and extract it to some folder (I created the folder /usr/src/linux-source-2.6.24/ on my system for this purpose)
3. copy your current kernel config to the new source directory you just made:
"cp /boot/config-$(uname -r) /usr/src/linux-source-2.6.24/.config"
4. goto the source directory and create a config file for compiling the module:
"cd /usr/src/linux-source-2.6.24/ && make menuconfig" (just press [rightArrow] then [Enter]
5. copy the following code and insert + save to some empty file (I used "/root/usbserial.c.patch" to save to):
# diff -Naur usb-serial.c usb-serial-v620.c
--- usb-serial.c        2005-03-01 23:38:37.000000000 -0800
+++ usb-serial-v620.c   2005-07-22 10:09:59.000000000 -0700
@@ -361,6 +361,7 @@
drivers depend on it.
*/
+static ushort maxSize = 0;
static int debug;
static struct usb_serial *serial_table[SERIAL_TTY_MINORS];     /* initially all NULL */
static LIST_HEAD(usb_serial_driver_list);
@@ -1060,7 +1061,7 @@
               dev_err(&interface->dev, "No free urbs available\n");
               goto probe_error;
       }
-               buffer_size = le16_to_cpu(endpoint->wMaxPacketSize);
+               buffer_size = (endpoint->wMaxPacketSize > maxSize)?endpoint->wMaxPacketSize:maxSize;
       port->bulk_in_size = buffer_size;
       port->bulk_in_endpointAddress = endpoint->bEndpointAddress;
       port->bulk_in_buffer = kmalloc (buffer_size, GFP_KERNEL);
@@ -1433,3 +1434,5 @@
module_param(debug, bool, S_IRUGO | S_IWUSR);
MODULE_PARM_DESC(debug, "Debug enabled or not");
+module_param(maxSize, ushort,0);
+MODULE_PARM_DESC(maxSize,"User specified USB endpoint size");
6. apply your newly created patch file to the source code of "usbserial.c":
"cd /usr/src/linux-source-2.6.24 && patch -Np0 -i /root/usbserial.c.patch"
7. if not all patches were applied successfully (was the case for me), you need to edit usbserial.c manually and replace the line that reads
buffer_size = le16_to_cpu(endpoint->wMaxPacketSize);
with the following lines:
buffer_size = (endpoint->wMaxPacketSize > maxSize)?endpoint->wMaxPacketSize:maxSize; port->bulk_in_size = buffer_size;
port->bulk_in_endpointAddress = endpoint->bEndpointAddress;
port->bulk_in_buffer = kmalloc (buffer_size, GFP_KERNEL);
8. compile the module (actually all serial driver modules used for usb devices, but still faster than compiling all kernel modules!):
"make -C /lib/modules/$(uname -r)/build M=/usr/src/linux-source-2.6.24/drivers/usb/serial"
9. make a backup copy of your old "usbserial.ko" by renaming it to something like "usbserial.ko.old", then copy your new patched "usbserial.ko" to /lib/modules/kernel/drivers/usb/serial/ and run "depmod -a".
10. After unloading your old usbserial (modprobe -r), you can now load your new "ubserial" driver module with the additional module option "maxSize=xxxx" (where xxxx can be 2048 for example), I use "modprobe usbserial vendor=0x03f0 product=0x1e1d maxSize=2048" to have it identify my SierraMC8775 modem properly and to give it a big enough data buffer to cope with HSDPA traffic.
You can easily check if you were successful in patching your "usbserial.ko" without having to load/reload it by easily typing "modinfo usbserial" - if everything went well you will see a new module parameter "maxSize" listed....
If everything went well you will have notably higher data transfer/download rates with your wireless 3G/UMTS/HSDPA braodband (you can easily check this with the bandwidth performance check on the bottom of my page).
Regards
Tuesday, March 17, 2009
Sony VAIO P - premium netbook?
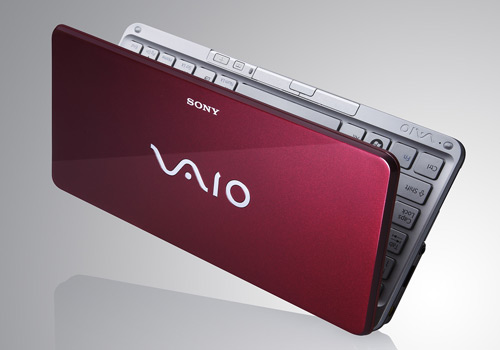 From its look & feel alone, the Sony Vaio P netbook pretends to be more than just a netbook, leaning more towards the high-end side of the "Mobile Internet Device" spectrum. Unfortunately to the average customer, this is also evident when looking at its list price (999 eur). Once that shock is digested, the happy sony customer can choose between four different case colors: "ebony black", "ivory white", "volcano red" and "forest green" all have glossy surfaces prone to fingerprint dirtying. Technical features are as follows: eight-inch back-lit wide-screen LCD (1600 x 768 pixels); Intel Atom processor running at 1.33GHz, supported by 2GB RAM; data is stored on a 60GB harddisk; 802.11 a/b/g/n wifi, 3G/UMTS/HSDPA wireless broadband and of course bluetooth ensure maximum connectivity everywhere. Sony's "Xross Media Bar" with own buttons on the lower edge of the keyboard enables audio/video playback without need to start Windows, which makes it a nice power-saving playback device. Of course a webcam is included too, but a really outstanding gadget of the Vaio P is its built-in GPS, making it a full-value navigation device. At dimensions of only 120 x 245 x 19.8mm it weighs in at just
  638 grams - this with a battery sufficient for 4 hours of mobile fun (according to sony at least). If you can spare the money and want a rolls-royce of netbooks, this is your best choice I'd say. Available in europe since february 09 I think..
Adding color-changing LED bottom lights to my eeePC - Part 1
 Since I like glowing light gizmos, I thought it would be cool to have an eee that would glow in different colors. If you're familiar with those ambiLight TVs produced by philips, you probably know already that they make the wall behind them glow in the colors of the picture they are just showing at the moment. This means a green hulk (seen in television) would make a green wall, giving you the impression of a more realistic image.
Now while the eee normally isn't hanging on a wall, (or standing face to front of such) mine at least often is standing on a white surface (my desk). Which would make for a nice color reflecting surface. You can surely imagine how it would look like in a dark room!

A new project was born. So I gathered all my google-fu skills, and found a nice LED controller board that would fit into my eeePC 1000H. While it cannot control the LEDs to match the display
 colors (watch out for part II of this article for real "ambilight"), the controller board I bought delivers individual 8bit pulse width modulated signals for each color, and thus is able to cycle through all possible color combinations (theoretically 16.7 mio different ones) at adjustable speed, and can stop at every color when a pushbutton is pressed (color preset stored even when everything turned off, until next pushbutton press). This was enough for the beginning, so I decided to give it a go. I also got myself some good RGB LEDs in smd form factor, and wired them to the controller board with parts of an old IDE cable I had lying around, of course using the proper resistor (120 ohm) in series to achieve the right current and not burn through my LEDs in several minutes..
 Those are the LEDs I used
The controller board itself turned out to run fine with the 5V I wanted to supply it with, so it was just slightly modified in that I removed the push button from it, to be able to relocate it to a more accessible area (the red cables on the upper picture...). The controller was then attached to the back of the miniPCIe wifi card by means of some double-sided tape, and got power supplied by wiring it to one of the external USB jack connector's 5V/GND pins (green wires on pic).
I drilled two holes into the underside of my eee's housing to accomodate the LEDs and made sure they had a nice round shape and smooth edges to make for even light distribution, and finally I assembled everything (which actually was the hardest part, due to place constraints with the IDE cable wiring).
But I think the result was worth it.
Judge for yourself..


(looks MUCH better in the dark)
If you would like to copy this mod for your eeePC, maybe it helps you to know that I bought the controller board from a company called "LED-tech", you can find it easily with the google search button on top of my page, its the second entry on the results page I think (the search function is customized exactly for such purposes - finding vendors of needed modding parts in no time). By the way, you can buy your LEDs from them as well, saves on shipping costs. I got mine from them too, and they are pretty good. ;)
Make sure to read about the second part of this adventure too (featuring true "ambilight", color changing in real time with the LCD's colors when watching movies - I designed my own microcontroller for this) , which will be made available soon on this blog (as soon as I finish the work on it).
HowTo: nice custom splash screen for your GRUB boot menu
Ever wondered if there's a way to change your GRUB bootmanager startup screen to something more appealing than those white and black ASCII lines? There is!!
Here's a complete walk-through description of the necessary steps (tested with Ubuntu linux 8.04):
First you need to edit your "/boot/grub/menu.lst" by opening a console window and typing
sudo gedit /boot/grub/menu.lst
then adding the line
splashimage=(hd0,6)/boot/grub/splashimages/grub-grey2.xpm.gz
somewhere at the beginning.
* (hd0,6) is the partition where your splash screen will be located, change to fit your needs! (grub has a strange enumberation scheme for partitions; its important you look at the file "menu.lst" for details on the data assigned to your ubuntu partition, SIMPLY locate the entry that says "Ubuntu 8.04" or whichever you have, right below it should read "root (hdX,Y)". Use this name for "splashimage=..")
* /boot/grub/splashimages/ is the folder where your splash images are located
* grub-grey2.xpm.gz is the file name of your splash image.
The splash image needs to be stored in a special way: you need to adjust the color depth to 14(!) colors (with gimp goto image->mode->indexed choose "generate optimum palette" and enter "14", then select an appropriate dithering algorithm which looks good on your picture) and change the resolution to 640x480, then save as xpm.
Now you just need to compress your splash image and copy it to the appropriate folder by typing
gzip filename-of-your-splashimage.xpm
sudo cp filename-of-your-splashimage.xpm.gz /boot/grub/splashimages
and voilà, the next boot will show up with a nice new look.
Here is the splash image I created for my grub (feel free to use it too if you like it,
just save as 14 color xpm with GIMP and compress like described above):

Monday, March 16, 2009
Aigo P8888W linux MID
This is one of my favorite MIDs - the AigoP8888. I simply love this design, easy and functional. It comes equipped with HSDPA, 802.11b/g wifi and bluetooth v2.0, two cameras (3.0/0.3MP), 24bit high fidelity audio, 4.8inch "slide" touchsreen at a resolution of 800 x 480 pixels covering a full QWERTY keyboard (the keys are just a bit too small for real ten-finger typing), further is has a microSD-card slot, spare USB2.0 jack, an optional GPS connector,  and the operating system (linux, you probably guessed it by the name already) is stored on a 4GB SSD and runs on an Intel ATOM clocked down to 800MHz, assisted by a single 512MB DDRII 400MHz RAM module.
This all really fits into a device measuring only 150 x 80 x 22 mm, at a battle weight of just 300 grams. You can rest assured it will NOT make your pocket become baggy if you carry this baby with you...
..theres just one minor downside to it, and thats the cost of more than 700 eur at present time!
 and the operating system (linux, you probably guessed it by the name already) is stored on a 4GB SSD and runs on an Intel ATOM clocked down to 800MHz, assisted by a single 512MB DDRII 400MHz RAM module.
This all really fits into a device measuring only 150 x 80 x 22 mm, at a battle weight of just 300 grams. You can rest assured it will NOT make your pocket become baggy if you carry this baby with you...
..theres just one minor downside to it, and thats the cost of more than 700 eur at present time!
VILIV S7: convertible MID with built-in GPS

Viliv recently has announced a very nice new 7inch convertible UMPC.
The "VILIV S7" comes equipped with 1.3-1.8GHz Intel ATOM processor, 1GB RAM, either 16GB solid state disk or 60GB hard disk, connectivity is ensured by a 3G/HSDPA modem and wifi as well as bluetooth. It has an external VGA connector, SD card reader, 1.3MP webcam and built-in GPS. The touchscreen (at a diagonal of only 7 inch) has a resolution of 1024x600 pixels, which makes for a pretty crisp and clear image. While this lightweight weighs in at only 800 grams, the battery still allows for up to 7 hours of continuous on-the-road use, making this a very desirable gadget for everyone interested in mobile computing. At least for me.
Targeted price and exact release date are not known as of yet.
HTC Fuze with full HSDPA support
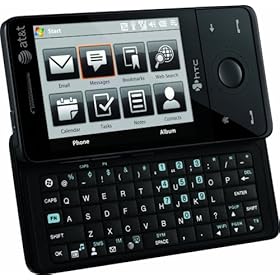 The HTC fuze is really an example of how the future of smart phones looks like. Reminding of the "Google G1" design-wise, it sports 3G/EDGE/UMTS/HSDPA, 802.11b/g wifi and bluetooth 2.0 for maximum connectivity everywhere.. built-in GPS with google maps support, complete outlook email client and mobile internet explorer thanks MS windows mobile 6.1 pro, integrated ICQ client - as well as a 2.8" TFT 480 x 680 LCD touchscreen, backlit QWERTY keyboard, microSD card reader, 288MB RAM (and 512MB ROM) are available for the 512MHz processor ("MSM7201A" made by Qualcomm, 3.2MP camera, FM radio, MP3 player and push-to-talk capabilities make this one of THE best smartphones money can buy - at a size of only 102 x 51 x 18mm and a overall weight of 165g incl. the 1340mAh battery (for up to 8h talk time or >400h standby).
I want one of those... But the retail price is around 500$US without service plan (or 250$ with one) which is a bit expensive for "just a cellphone". ;)
iRiver D5 - electronic dictionary and more
 It is sometimes amazing to see all those new electronic devices being intoduced into the asian market, with features never heard of in north american and european countries yet - the iriver D5 serves as a good example.
This cutee comes with a full 52-key QWERTY keyboard, Bluetooth, 4GB RAM, a three-inch LCD with 480 x 272 pixels, playback capability for MP4 and flash videos as well as MP3, OGG and WMA audio files. Also included is a voice recorder and FM tuner, and last but not least full pocket translator usability. Sadly only available through asian retail stores but it does look nice - and will definately fit into your shirt-pocket at a thickness of 15mm closed. And as you can see it is a true handheld device. ;)
Asus announces new eeePC 1008HA "shell" model
Asus has confirmed that there will be a new slim eeePC model 1008HA available by spring this year. At a price of 600 eur. it is only 2.5cm thick and weighs at 1.10kg, and features (amongst the usual multi-touch touchpad) a 10 inch display, an enlarged keyboard (with hotkey for locking said touchpad), bluetooth 2.0, abgn wifi, 3.75G wireless broadband and WiMAX modem functionality for maximum connectivity. Also included is a new GUI and software allowing for easy file sharing and transfer from and to other eeePCs (no internet needed).
It doesn't look like there will be much room for additional mods but hey, alas its one of the smallest and for sure the best-looking eee PC ever.
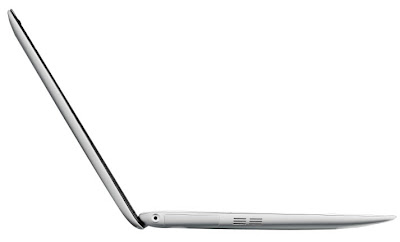
Don't you like that slim look too? be honest! ;)
multi-touch touchpad) a 10 inch display, an enlarged keyboard (with hotkey for locking said touchpad), bluetooth 2.0, abgn wifi, 3.75G wireless broadband and WiMAX modem functionality for maximum connectivity. Also included is a new GUI and software allowing for easy file sharing and transfer from and to other eeePCs (no internet needed).It doesn't look like there will be much room for additional mods but hey, alas its one of the smallest and for sure the best-looking eee PC ever.
Don't you like that slim look too? be honest! ;)
eee videophone with skype functionality announced

Asus has recently announced the release of a new standalone videophone. The "aiGuru S1" is completely based on skype. It comes equipped with a 7" LCD and a 0.3MP camera (barely sufficient for skype purposes) and has a battery allowing for only 20 minutes of wireless talking, if the built-in wifi interface is used for connecting to the internet. Since the purpose is probably more to act as a stationary device, it seems wise that asus has added a LAN interface too.. at an estimated price of around 250 eur it will most probably serve mainly companies searching for a good video conference terminal.
Frankly, I wouldn't know what to do with it since my eeePC has both a better camera and LCD, plus real mobility and, of course, I have skype running on it too. So I have no idea why I should buy such a videophone instead of (or in addition to!?) a nice eeePC (which is much more versatile too).
But the design is rather nice to look at, don't you think? :^)
What to do if you want superb wifi reception??
Adding an external antenna connector to the eeePC!
Having good wifi reception is sometimes important if you like having fast internet access - nothing new. But what to do if you want to be sure that you always have the best wifi reception/highest signal quality possible? Best thing is using some kind of antenna. Now my eee PC 1000h of course already has its own two wifi antennas built in, but they are not really helpful in difficult locations where reception is hindered (behind several walls or inside a car for example, basically every place with no direct sight line to the access point), since they are rather small and weak. To improve send/receive performance, some kind of external antenna with a high gain is what is needed.
 Most of these antennas have a connector called RP-SMA, so my idea was to build such a connector into my eeePC for attaching high-gain wlan antennas. The right place seemed to be where the kensington lock is located normally. It was removed easily, and after drilling a hole and some filing, I managed to fit said connector into it - actually I also had to remove a triangular shaped piece of my eee's motherboard to create the necessary free space (which was a bit scary to me), but luckily it did not do any harm at all. I bought a pigtail cable with the right connectors for this purpose - RP-SMA male for the antenna side and U.Fl / Hirose for the wifi card side of it. It had a very professional looking shielding and cost me 12 eur.
 I just disconnected one of the original antenna cables (the black one) from my wifi card, and replaced it with the pigtail cable. Now I can attach high-gain wifi antennas to my eeePC as needed, and it looks cool too!
I use a 2dBi gain antenna most of the time, since it works well and looks good on my 1000h. I salvaged it from an old "siemens" wifi router..
..and guess what, now I still have a stable 11MB/s hundred meters away from my home. Mission accomplished! :)
 "gold
"gold
is good"
 antenna stub fits well
Many more useful hardware mods to come, once I manage to write about it and upload the pictures..
stay tuned.
Directory World
Dmegs Web Directory
Blog Search Engine
Blog Directory
Having good wifi reception is sometimes important if you like having fast internet access - nothing new. But what to do if you want to be sure that you always have the best wifi reception/highest signal quality possible? Best thing is using some kind of antenna. Now my eee PC 1000h of course already has its own two wifi antennas built in, but they are not really helpful in difficult locations where reception is hindered (behind several walls or inside a car for example, basically every place with no direct sight line to the access point), since they are rather small and weak. To improve send/receive performance, some kind of external antenna with a high gain is what is needed.
 Most of these antennas have a connector called RP-SMA, so my idea was to build such a connector into my eeePC for attaching high-gain wlan antennas. The right place seemed to be where the kensington lock is located normally. It was removed easily, and after drilling a hole and some filing, I managed to fit said connector into it - actually I also had to remove a triangular shaped piece of my eee's motherboard to create the necessary free space (which was a bit scary to me), but luckily it did not do any harm at all. I bought a pigtail cable with the right connectors for this purpose - RP-SMA male for the antenna side and U.Fl / Hirose for the wifi card side of it. It had a very professional looking shielding and cost me 12 eur.
 I just disconnected one of the original antenna cables (the black one) from my wifi card, and replaced it with the pigtail cable. Now I can attach high-gain wifi antennas to my eeePC as needed, and it looks cool too!
I use a 2dBi gain antenna most of the time, since it works well and looks good on my 1000h. I salvaged it from an old "siemens" wifi router..
..and guess what, now I still have a stable 11MB/s hundred meters away from my home. Mission accomplished! :)
 "gold
"goldis good"
 antenna stub fits well
Many more useful hardware mods to come, once I manage to write about it and upload the pictures..
stay tuned.
Directory World
Dmegs Web Directory
Blog Search Engine
Blog Directory
Subscribe to:
Posts (Atom)


